Tuesday, March 28, 2017

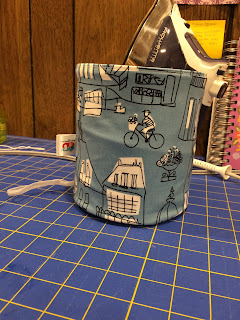
Kismet Trinket Box by Sew Sweetness and Erin Vader Fabric!

My daughter, Erin, is a weaver.  She has a huge loom that has it's own bedroom and she makes the most lovely fabric on it.  Once I started to see her beautiful weaves, I asked her to make me some fabric to sew with.  She made me a LOVELY tartan plaid that I am terrified to cut!  She also made some smaller pieces.  I decided to use one of those and make a Kismet Trinket box.

The fabric started like this....
A plain weave in a herringbone pattern
It ended up looking like this.....

I fused SF101 to the entire piece of fabric and then cut it out.  It was still tricky sewing the box together but I really think that is because it was so small.  I think it's so cool that I was able to take Erin's weaving and sew it into something.  It's giving me the courage to cut into that beautiful tartan she made for me....
More on that later.....

Monday, March 27, 2017

Two Zip Hipster by Erin Erickson

I've made this bag before and given it as a gift.  I really like the pattern directions.  They are thorough and there are pictures for all the fussy bits.  This patterns assumes you are a beginner.  It was one of the first that I bought and having this turn out so well gave me confidence to try other more complicated patterns.  It's one step at a time!

The purse has a zippered pocket on the outside for your phone or a handy slip pocket behind that for the phone, if you prefer.  I like my phone to be secure so zippered pocket it is!  The finished size is 11" tall, 9" wide and 1.5 deep.  The strap adjusts from 30" to 56".

I think this is the perfect travel cross body.  Easy to stick in a bigger tote or wear across your body and on your hip for security.

I'm pretty excited with the way the fabric lined up on the front pocket.  I chose to do the top of the purse in the same fabric as the lining because I thought the print would be way to busy covering the entire purse.  I also used a metal zipper on the pocket for the first time.  I like the look.  Bad news was I had NO gold purse hardware so I had to mix my hardware.  Fortunately, this purse doesn't have a ton of it so I'm hoping it won't be a problem.  
The back of the purse is plain black fabric, as requested by my friend who is a lover of ALL things lighthouse!  I was very excited when I found the fabric for that reason.  I found it in the clearance bin at JoAnn Fabric as a remnant.  So it was 50% off the remnant price.  $3.00!  And I just KNEW who would love it.  
Here's a photo of the entire purse.  Please excuse the photos.  I had foot surgery and am currently using a rolling chair to get around my sewing room.  More professional photos in the future (I promise!)
The pattern can be found at Erin Erickson's website.  


Wednesday, March 22, 2017

Basket Tote by Sew Can She

Since being sidelined with foot surgery, I've had time to catch up on things that have "caught my eye" online.  I enjoy following blogs and one of the bloggers I follow is, Sew Can She by Caroline Fairbanks-Critchfield.  She is a fan of Pinterest and frequently found pictures for projects with no instructions.  So she runs a monthly poll on her blog giving fans the opportunity to vote on which project they'd like to see made into a pattern.  Big bonus is her patterns are free!  This tote was posted in February 2017 and I saved it hoping to have time to make it.

I made mine out of Essex Linen denim (love essex linen) and some cotton fabric I had in my stash.  The piping was a bit tricky but I worked it out by being persistent.  The trick was to sew on the piping and turn it right side out to make sure that the raw ends were encased and that the basting sticking was invisible.

The handles were tricky.  There were a couple of tutorials the website led me to and because my lining had some rayon in it, when I turned them right side out, I punched through the end of one.  That handle isn't perfect (design element!)  

There were 2 options for closing the tote: magnetic snap (my choice) or a zipper.  There was a small slip pocket on the pattern but I never use those so I omitted that from mine.  In the end, it turned out fairly well.


One note about the website, Sew Can She.  It is LOADED with ads.  I worked off an inexpensive chromebook and the number of ads causes my computer to freeze.  


Wednesday, March 15, 2017

Fat Quarter Pop Up


Fat Quarter Pop-Up....

I was at a fabulous new fabric store in Troy, Michigan (Fabric Affair) with my sister-in-law, Gail and I found this sweet little pattern for pop up containers.
It looked fun and quick so I thought I'd give it a try.  It was VERY easy to make.  Definitely something a beginner could tackle.  It comes with instructions and the wire needed to Pop Up the final project.


My only quarrel with the project would be the way the pattern is written.  It calls for a fat quarter of fabric (which I bought at the store) but once I started working on it, I realized that would not be enough.  I have an obscene amount of stash, so I dug out a matching print midway through the cut out process.  My other objection is the way the pattern is written.  When you are working with pieces that are almost square, it's important to use measurements when giving directions.  If something is 10 inches and you fold it in half, it should now measure 5 inches.  This is a HUGE heads up that you might be working with the wrong side!  This is particularly important when working with beginners!

Beyond that, the pattern is easy to make and the final product is super cute!

The big question now is where to find more of the pop up wires so I can make a few more?

My new passion....making my own clothes

I worked at a small elementary school for 3 three years that was committed to being a green school.  I worked with the green committee and learned a great deal about being green.  Much of what I learned had to do with being aware of being local.  Our food, clothes, and products that we use in our life spend a lot of time being shipped from somewhere else to here.  I began to make a conscious effort to remove the shipping from my consumerism.  There is an awesome farmer's market nearby that is held weekly and provides fresh, local food for sale.

As a teacher and union member, I wanted to find products that were Made in America.  I want the clothes I wear to support American workers and to be made ethically by people that were fairly paid for their labor and by adults, not children in third world countries.  To that end, I've decided to try to make most of what I wear.

Being slightly amazonian (5"10'), I've always struggled finding clothes that fit but I've never had much success in altering commercial patterns.  I took an online class recently where the teacher used a sloping ruler!  Game Changer! I bought one on sale from JoAnn's with a 50% coupon for under $10!  I started using it with the Bronte t-shirt pattern made by Jennifer Lauren.  It turned out fabulous.  I have a very small waist and bigger hips and the sloping ruler helped me alter this area so the finished product actually looked great!  I've been doing this a while and thought maybe it was a happy accident so I made another one and it also looked good!
UPDATE:  A picture of my muslin Bronte shirt


I next purchased the metro t-shirt pattern.  The first shirt I made ended up with very tight sleeves but I removed them, altered the sleeve width using my new handy sloper, cut new sleeves and sewed them in.  Ta-da!  It fits perfectly!  I've made 4 other metro t-shirts and they all look and fit great!

I really like the indie patterns.  The designers seem to take a great deal of time making the instructions simple and easy to understand.  I take the AO file to a printer and have it printed on a big sheet of paper and then copy the size I'm going to use.  I'm currently storing the patterns rolled up like blue prints.  Not sure if that is the best way to go but I truly cannot think of another way to store them.
UPDATE:
My first Metro t-shirt.  I learned you need a lot of stretch for this shirt.  The fabric was very cottony.  This is the first shirt with new sleeve.  Not my fav because it lacks stretch.

These are the ones I made after learning about knit stretch.  I like them much better.  I've actually gotten complements on them!  So nice to wear something that actually fits well!
 Check out the sleeves on this one.  The length actually covers my wrists.  That NEVER happens in ready made long sleeve shirts!


Please ignore the mess behind me!  I am still in a foot cast and the house is a hot mess!

Sew Fun

So I love teaching and I love sewing.  I got the idea of teaching a sewing class.  I mentioned it to my wonderful sister-in-law Gail, who is a college professor on the west side of the state.  She ran with it and asked her teaching friends if they'd be interested.  They were and so I taught my first Sew Fun class.  It was a make and take.


The class cost $20 for each student and they received everything they needed to complete Noodlehead's fabric bowl.  I provided fabric, interfacing, rivets, and handles.  All they needed was a sewing machine.  It was a great experience and I learned a LOT about teaching sewing.

The first thing I learned was there are a ton of people out there that have always wanted to learn to sew and many of them are intimidated by the process.  Maybe their first exposure was in a school setting and they didn't receive the help they needed because there were 29 other students in the class.  My class was small...10 people so I was able to reach out to everyone as  they worked.

The biggest challenge we faced was sewing machines.  Everyone brought one but not everyone knew how to work them or even thread them.  I spent a lot of time playing with machines and not as much time helping to teach skills.

Everyone worked at a different pace so I wasn't sure how to explain the steps.  I made the bowl up in different steps and took them to show what the bowl would look like as we progressed.  That was a good idea because the visual helped me quickly explain what to do next.

By the end of the class, everyone had a finished bowl and was happy with what they had accomplished!

I think everyone enjoyed the class and I've been invited back next month to teach a small zippered bag.

Let's Get Started

I did it!  I retired from public school teaching.  I worked for 15 years as a public school librarian at K-6 and middle school buildings.  It began as a fun adventure.  Unfortunately, public schools are now under siege.  So I walked away and am now onto a new adventure.

I've been sewing since I was 12 years old.  My parents sent me to a Singer store to learn to sew so I could help make clothes for my 8 brothers and sisters and the many foster children that came through our home.  I then honed my skills in Home Ec in middle school in Mrs. Kite's class.

Sewing is many things to me.  It has been an escape from reality and a way to express my creativity but it has been a constant in my life and I am grateful for it's presence.  I've sewed many different things while on this journey.  I've made the flower girl dresses for my wedding.  I made MANY clothes for my children and even my husband.  I've made clothes for myself. I've decorated my home with curtains and table runners and comforters.   I've made and sold purses galore.  There always seems to be something that catches my eye and I think...oohhh...I could do that!  And so I try....

I decided to start this blog for two reasons.  I want to chronicle my continuing sewing journey and I want to encourage others to join in.  So if you are interested, please stop and check out Sew What's Up?